Sunday, May 18, 2014

Teensy 3.1 Accelerometer - Control a Game Object in Unity

Getting the accelerometer data from the Teensy is nice, but the WPF application with some lines on the screen was sort of boring. I wanted to do something more fun with the Teensy 3.1 Accelerometer - use it as a game controller!  So this project is all about using the Teensy 3.1 Accelerometer to control an airplane on the screen using the Unity game development suite.


Hardware Setup

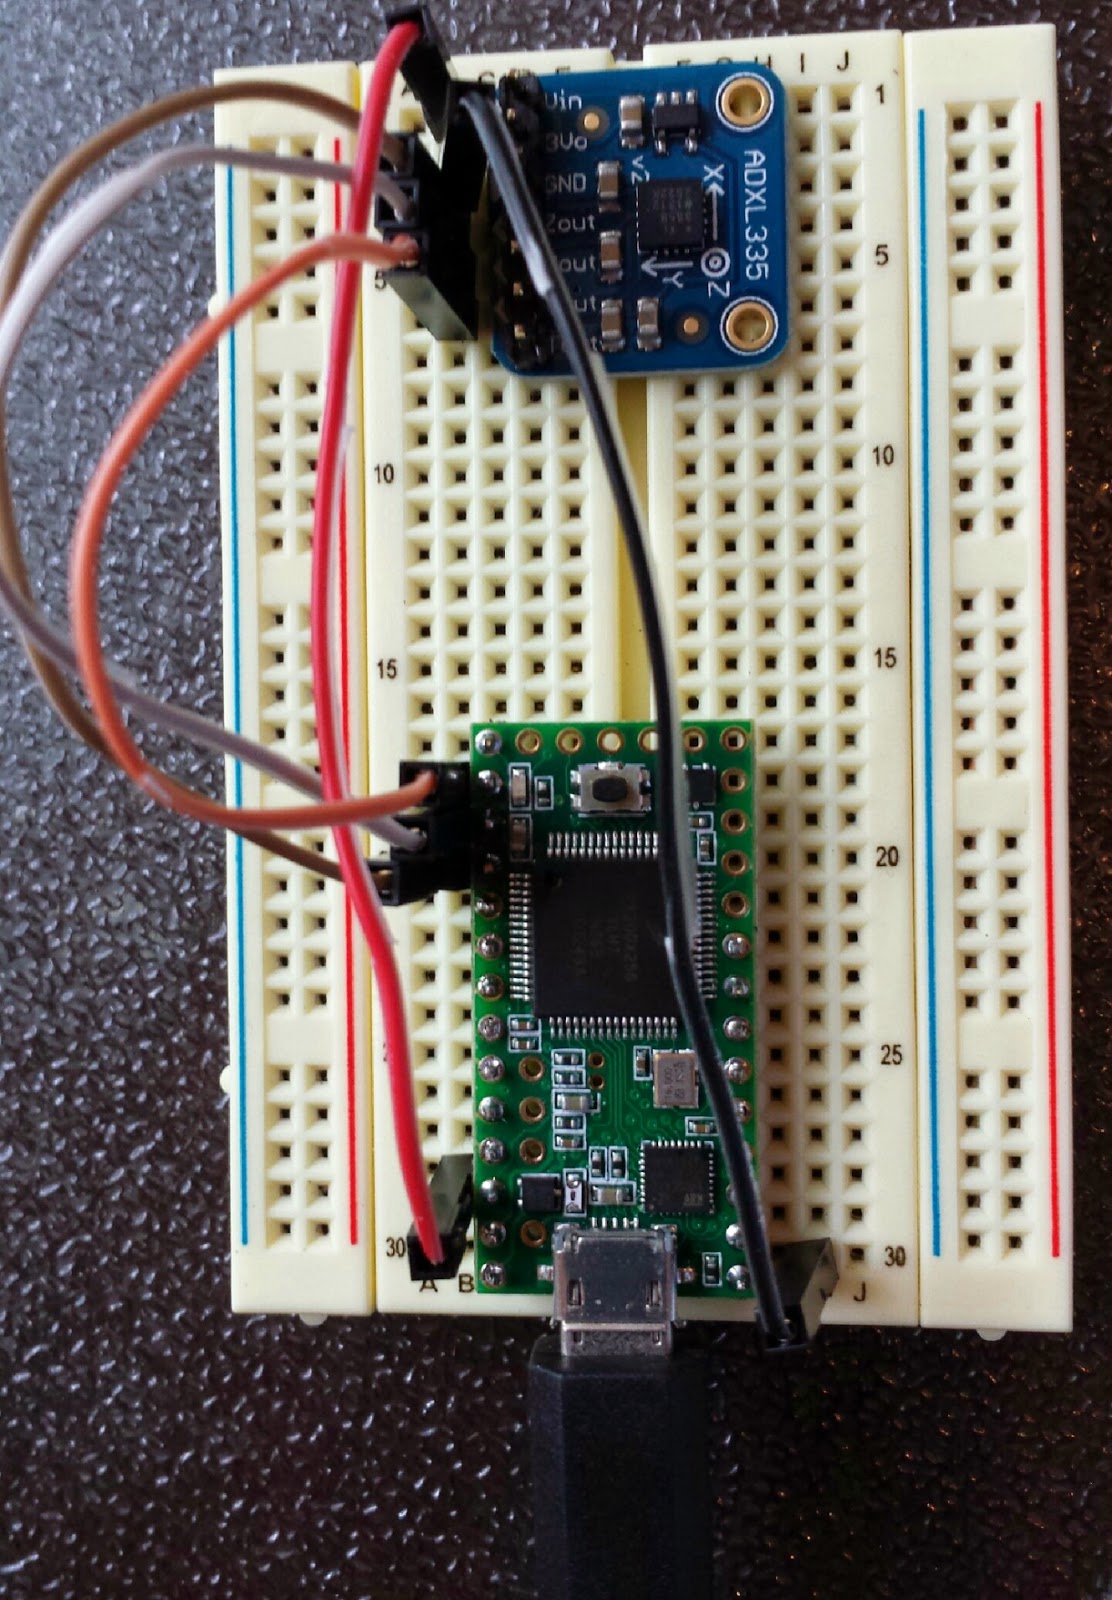
  1. Follow the instructions to build the Teensy 3.1 Accelerometer. This will be used as the game controller through a  USB serial connection.
  2. Note: the Unity game expects the Accelerometer's x, y, and z axis' to be oriented with the Y-axis arrow pointing to the right of the user and the X-axis arrow pointing toward the user when the circuit is in use. 


Software Setup

  1. Download and install the Unity game development suite. (this takes a while, it's a big download)

Now lets take a get the Unity project working.

Step 1 - Download the Unity Plane Game project.

  1. Download the UnityPlaneGame.zip file and extract it to a UnityPlaneGame directory. 
  2. Create an Assets directory under the UnityPlaneGame directory that was just created on your local drive.
  3. Download everything in the UnityPlaneGame/Assets directory of the repository and to your Assets directory. 
  4. Extract the .7z compressed files to sub directories of the Assets directory that match the compressed file names. You will need 7-zip to extract the files. You can download 7-zip here.
  5. Copy the scripts directory and other files directly to the root of your Assets directory. Your Assets directory file structure should look as shown below. 

Step 2 - Open the Unity Project.


  1. Open the Unity Game development suite. 
  2. From the "File" menu, select "Open Project", then choose "Open Other" at the bottom left corner and browse to the UnityPlaneGame directory. Then click the "Open" button.
  3. The project should open and look something like the image below.

  4. Now Choose "Build and Run" from the "File" Menu to make sure the project will build. If not, verify the above steps.

Step 3 - Change the COM port to match your Teensy 3.1 Accelerometer

  1. From the Project window in Unity, navigate to the scripts directory and open the PlaneAnimator.cs script by double clicking on the file. The file will open with MonoDevelop. 
  2. In the script, change the COMPORT string from "COM6" to the COM port that your Teensy 3.1 Accelerometer is on and Save your changes.


Step 4 - Run the Game

  1. At this point, make sure your Teensy Accelerometer is plugged in. (The USB cable). The game is programmed to open the serial port only once on start up, so it will not work if you plug it in after the game is already running.
  2. Return the the Unity project window. 
  3. From the File menu, select Build and Run. A window will open with the Unity logo in it, and then the game scene will appear with the plane visible on the screen. Try using the Teensy accelerometer to control the plane. Tilting the accelerometer left and right should make the plane move left and right. Also try tilting it back with the front side higher than the backside. That should make the plane climb on the screen. Tilt it in the opposite direction to make the plane dive. See if you can find the buildings and fly through them! There are no collisions in the game so you can fly through anything! 


Sunday, May 11, 2014

Teensy 3.1 Accelerometer - Controlling WPF UI Objects

Now that I can get the data from the Accelerometer, it would be nice to do something with the data. This project demonstrates how to use the serial data from the  Teensy 3.1 Accelerometer project to update objects on a screen in a simple C# WPF (Windows Presentation Foundation) application.  The data received from the accelerometer is used to change the size of lines mapped to the X, Y, and Z axis values of the accelerometer.

1. Complete the steps described to hook and program the Teensy 3.1 Accelerometer

Software Setup

3.  Get the WPF application code. Download the repository as a zip file and extract it. 

Set the COM Port and Build

4. Navigate to the  ADXL335SerialApp directory and open the ADXL335SerialApp.sln solution file with Visual Studio.
5. Open the Window1.xaml.cs file and change the COMPORT to the one used by the Teensy accelerometer.


6. Save the file and build the solution.   Make sure there are no compile errors in the build Output window. If the build succeeded, an executable file named "ADXL335SerialTest.exe"  will be created in sub directory (usually  ADXL335SerialApp/ bin/Release or bin/Debug). The exact file location of the executable can be found in the build "Output" window.


Run the Application

8. Double click on the executable file to run the application. A window with the following screen should appear. The white text box area is where exception messages will appear if they occur. 


9. Now make sure the Teensy accelerometer USB is plugged in. 
10. Press the "Start" button on the screen to start controlling the X, Y, Z axis lines with the Teensy Accelerometer.

If the accelerometer is sitting on a flat surface, only the blue line representing the Z axis will be visible as shown below.

11. Try rotating the Teensy Accelerometer so that the X or Y axis is pointing upward. The lines on the screen will change in real time as you rotate the accelerometer. 

12. Press the Stop button to stop listening to the serial port when your done.

Saturday, May 10, 2014

ADXL335 Accelerometer on the Teensy 3.1 - Getting Started

This is a little project to get started with the Teensy 3.1 and a triple-axis accelerometer. I want to get data from the accelerometer in a form that can be used by an application so the code in the end normalizes the values to the G forces measured and outputs the values o the USB serial port.


This project only requires a couple parts. You will also need some wire,  a small breadboard and a micro USB cable. You will also want the pin out for the Teensy 3.1.

Parts List


Total Cost  $35


Step 1 - Circuit Setup

I used analog input pins A0, A1, and A2 for the x,y,z outputs from the accelerometer and powered the accelerometer directly from the 3.3V output of the Teensy. I soldered headers onto the the Teensy's side pins to make it breadboard friendly.


Step 2 - Programming Environment Setup

The Teensy can be programmed through the Arduino IDE with the Teensyduino add on and a micro USB cable. Many of the Arduino libraries are also compatible with the Teensy. 
  1. Download and install the Arduino IDE if you do not already have it.
  2. Download and install the Teensyduino add on for the Arduino IDE.
  3. Download the Teensy loader program for your OS .
Next we need to calibrate the Accelerometer.

Step 3 - Accelerometer Calibration 

We need to determine the max and min values for each axis of the accelerometer. To do this, you need get multiple readings with the accelerometer oriented in the min and max positions along each of the axis. The values will be used as constants in the code that will run on the Teensy to get scaled readings.

I used a modified procedure based on the calibration instructions on the Adafruit learning site to calibrate my accelerometer because I didn't want to do any additional hardware setup. 

Compile and Load the Calibration code

  1. Download the ADXL335 Calibration sketch and open it in the Arduino IDE.
  2. Open the calibration sketch in your Arduino IDE. 
  3. Plug in the Teensy micro USB cable.
  4. Select Teensy 3.1 as the board under Tools -> Board -> Teensy 3.1
  5. Verify that the correct COM port is selected for the Teensy under Tools->Serial Port. (It will probably be the only one shown unless there are other COM devices connected to your computer.)
  6. Compile/Verify the sketch by typing Ctrl+R or clicking on the check mark icon near the top left corner.
  7. When the sketch is done compiling, the Teensy Loader will open automatically. 
  8. With the Teensy Loader in Auto mode (the Auto button is green as shown below), press the button on the Teensy board to upload the calibration code.


Perform the Calibration

  1. Open the Serial Monitor under Tools-> Serial Monitor in the Arduino IDE.
  2. Set the baud rate. The baud rate can be set to 38400 using the drop down at the bottom right corner of the Serial Monitor window. 
Measure Z-Max 
  1. Place the Accelerometer circuit on a flat surface to get the Z-max value.
  2. Send a "1" to the Teensy using the Serial Monitor Send feature to run the calibration code. You should see output in the Serial Monitor as shown below. Notice that the upper range for Z is now 612, this is the max value for Z when the board is at rest. The X and Y Min values have changed too, but we are not done with those yet.

Measure Z-Min
  1. Hold the Accelerometer circuit upside down against a flat surface(such as the underside of a table) to get the Z-min value. (Hold it still during the measurement). 
  2. Again, send a "1" to the Teensy using the Serial Monitor Send feature to run the calibration code. A second calibration output will appear in the Serial Monitor as shown below. Now the lower range for Z will have changed, in my measurement, it was measured at 413 as shown below. 

Measure the Y-Max, Y-Min, X-Max, and X-Min Values

Repeat the procedure above with the circuit oriented in the Max and Min positions for the X and Y axis's using the following orientations:

Y-Max:  Y arrow on the accelerometer should be pointing straight up. 
Y-Min:   Y arrow on the accelerometer should be pointing straight down.
X-Max:  X arrow on the accelerometer should be pointing straight up.
X-Min:   X arrow on the accelerometer should be pointing straight down.

The min max values for each axis are retained through calibration runs so the final output will have the min and max ranges for the raw values for each axis. These values will be used as constants in my code to normalize the output values.


Step 4 - Program the Teensy

Now that we have the min max values to use, we use the values in code to send normalized values between 1 and -1 for the x, y, and z orientations detected by the accelerometer.
  1. Download the Teensy Accelerometer Code
  2. Open the TeensyAdxl335.ino sketch and change the min/max values for each axis to the values measured in the calibration above. 
  3. Save and Verify/Compile, and upload the code to the Teensy using the same procedure described above to upload the calibration code.
  4. Use the Serial Monitor to verify the output from the Accelerometer. You should see the out values scrolling. The output should look like the view below.